Monday, June 18, 2012

A Multiboot USB Drive with Windows 7, Ubuntu, UBCD4Win, Drive Tools, etc. - Second Cut

I had previously worked through the steps to create a bootable USB drive.  I had intended to create just a simple alternative to booting the basicWindows 7 system recovery tools from a CD, but it turned out to be easier to make a more powerful and flexible multiboot USB drive.  Now I had a larger (16GB) USB drive, and more stuff to put on it.  This post contains what I hoped would be a simpler and more comprehensive description of the process of setting up that kind of multiboot device.

USB Drive Setup

I started with YUMI and a bunch of ISOs, either downloaded or created with ImgBurn (see the previous post).  For now, the ISOs I wanted to install were the full Windows 7 DVD, the Windows 7 System Recovery CD, the full Windows XP SP3 CD, Ubuntu 10.10 and 12.04, Knoppix, Acronis True Image Home (ATIH) 11 and also ATIH 2011 with Universal Restore, Ultimate Boot CD (UBCD) and UBCD4Win, Balder FreeDOS, Hiren's Boot CD, BartPE, U.S. DOD LPS, Super Grub Disk, Super Grub2 Disk, MHDD, Microsoft Windows Memory Diagnostic, Memtest86+, Balder FreeDOS, Darik's Boot & Nuke (DBAN), Clonezilla, GParted, Partition Wizard, Parted Magic and diagnostic CDs for Samsung, Hitachi, Western Digital, and Seagate hard drives.  Some of these, I knew, were redundant.  I figured I would work out the details later; I was just curious to see how much would fit, and what would work, in the multiboot approach.

Some of those ISOs were already listed as distributions in YUMI.  That was true for Balder FreeDOS, Clonezilla, DBAN, GParted, Hiren's Boot CD, Knoppix, Memtest86+, Parted Magic, Partition Wizard, both flavors of Ubuntu, UBCD, and the Windows 7 installer.  For the others, there was an option at the bottom of the YUMI menu:  Try an Unlisted ISO.  Except for that last choice, using the option to install a recognized ISO would remove that ISO from the list, apparently to help people keep track of what had already been installed.

The ISOs that I had created from CDs, using ImgBurn, were not necessarily named properly. YUMI didn't recognize some of them until I renamed them to match the hint provided in YUMI. For instance, YUMI wanted the downloaded (still zipped, yet renamed to remove the ISO pre-extension) version of Memtest86+.

The installation process got interrupted partway through: I had to pull out the USB drive to use the jack for something else, and wound up killing YUMI and starting again. Neither Windows Explorer nor Windows Disk Management were able to see the drive at all when I reinserted it. This may have been due to not removing the USB drive properly.  I had to plug it into another computer, eject it from that computer, plug it back into the machine running YUMI, and kill and restart YUMI again, to get YUMI to see it again. At about the same time, I also noticed that YUMI would no longer make a program or other ISO (e.g., Ubuntu 12.04) available on its list, once that program was installed on the multiboot USB drive.  Also, YUMI now seemed not to be making any new files or folders on the USB drive, even though it was reporting that the various processes were completing successfully.  The ejecting and reinserting process also apparently fixed these problems:  now, as before, the programs already installed on the USB drive were no longer listed in YUMI, and I could see new things being added to the USB drive.

Windows Explorer seemed to tell me that the installation process was somewhat irregular, presumably due to the divergent demands of these various programs.  Many got their own subfolders, under the "multiboot" folder on the USB drive.  Hiren's Boot CD got its own folder on a higher level; UBCD was represented by just an ISO file in an "ISOS" folder on the USB drive; Balder FreeDOS seemed to have been installed as nothing more than a single file in the multiboot folder.

As noted above, I had to use the "Try an Unlisted ISO" option for a number of the programs listed above.  I used this, first, with the full Windows 7 DVD.  I decided to take this route, after first using the canned "Windows 7 installer" option because, as noted above, I was hoping to install several flavors of Windows.  When I used the canned installer option, the process took only a few seconds, suggesting that perhaps that option was just copying over the information needed for a system recovery approach.  But when I used the custom "Try an Unlisted ISO" option, YUMI indicated that it was copying 3 GB of material, and took several minutes to do it.

After installing Windows 7 on the multiboot USB drive, I used the Unlisted ISO option for the Windows System Repair CD.  That took only a few seconds.  The USB drive's ISOS folder now contained entries for both of those ISOs.  Same thing when I added Windows XP.  I proceeded likewise for the other unlisted programs noted above:  two flavors of Acronis, BartPE, MHDD, Microsoft Windows Memory Diagnostic, two varieties of Super Grub Disk, UBCD4Win, U.S. DOD LPS, and four hard drive diagnostic CDs.

I made some additional observations during these processes.  One was that the ISOs seemed to be copied verbatim into the ISOS folder.  It was possible that long filenames, or filenames containing spaces or odd characters, could cause problems for some programs.  In other words, looking ahead, I wondered whether it would have been to my advantage to rename some ISOs, at least temporarily, to something simpler.  During each installation, YUMI would report information of the following nature:
Creating Label MULTIBOOT on F:
Good Syslinux Exists...
A Previous Multiboot Installation was detected...proceeding to add your new selectio...
Copy to F:\multiboot\ISOS\Super Grub Disk.iso
Try an Unlisted ISO and its menu entry were added!
All Finished, Process is Complete!
Most of these processes took only a few seconds.  After all, these ISOs were mostly very small, containing just a utility program.  Instead of using the "Try an Unlisted ISO" option, I probably could have configured many of them as "Try an Unlisted ISO (Run from RAM)."  When I had finally worked through the foregoing list of programs to install and indicated that I was done, YUMI said,
YUMI has completed the installation.

Your Selections have been Installed on your USB drive.

Feel Free to run this tool again to Install more Distros.

YUMI will keep track of selections you have already Installed.
Windows Explorer > Properties indicated that the 16GB USB drive was now about 60% full (around 8.5GB used, out of 14.9GB actually available).  I exited YUMI, ejected the USB drive, put it into my laptop, and booted it.

Using the Multiboot USB Drive

When I booted the laptop with the USB flash drive (hitting Esc at the appropriate time to see the option of booting from that drive), I got the YUMI Multiboot USB screen.  It presented four options:  Linux Distributions, System Tools, Other Operating Systems and Tools, and Directly Bootable ISOs.  Under Linux Distributions, it showed me the two Ubuntus (10.10 and 12.04) and Knoppix.  So that part of the installation seemed to have worked.  Under System Tools, it showed me Clonezilla, DBAN, GParted, Parted Magic, Partition Wizard, Balder DOS image (FreeDOS), and Ultimate Boot CD (UBCD).  It had nothing under Other Operating Systems and Tools.  Finally, when I chose Directly Bootable ISOs, it said, "Launching GRUB," and then it showed me quite a list:  Windows 7, the Windows 7 Repair CD, Windows XP, two flavors of Acronis, BartPE, MHDD, four HDD diagnostics options (Hitachi, Samsung, Seagate, and Western Digital), Windows Memory Diagnostic, two flavors of Super Grub Disk, UBCD4Windows, and US DOD LPS.  Collectively, these items accounted for everything on my original list except Hiren's Boot CD and Memtest86+.  I wasn't sure how those had slipped through the cracks.

I decided I wouldn't be able to run all of these programs at this point.  But I did want to try a few.  I started off with the full Windows 7 CD.  It worked.  I was able to go into its repair options and run CHKDSK on an external USB hard drive.  (I had to skip past some dialogs in which Windows expressed its interest in repairing my system.  I was not surprised that it was confused by what it found, and there seemed to be a good chance that it would make a mess of everything as a result, if I let it go ahead.)

After running CHKDSK on that external drive, I exited Windows 7 via its Restart option.  That put me back at the point of hitting Esc and seeing the YUMI Multiboot screen again.  This time, I tried Ubuntu 12.04.  I was able to use its copy of GParted to scan the laptop's internal and external hard drive.  GParted found problems with the laptop's C partition, so I retarted from within Ubuntu -- which, again, restarted the computer hardware rather than putting me back at the YUMI Multiboot screen, as might have happened in a virtual setup.  This time, I chose the Windows 7 System Repair CD, rather than the full Windows 7 DVD, and I was able to use that to run CHKDSK.

Next, I wanted to defragment the laptop's internal and external hard drives.  Of course, I could do that from within Windows after a normal boot, but it occurred to me that I didn't actually know, or recall, whether there were any defrag tools that could run from a non-Windows boot -- and, if there were such tools, I didn't know whether they would be included in any of the ISOs that I had installed on the Multiboot USB drive.  One thread indicated that Ubuntu, itself, did not have an NTFS-compatible defragger that would be advisable for use on an NTFS partition, especially on drive C, with the possible exception of ntfsfix.  So I looked instead at UBCD.  It seemed to be working -- its System Speed Test ran, producing a processor benchmark and other information -- but it did not seem to have anything for defragging, and it exited awkwardly, requiring a Ctrl-Alt-Del reboot.

BartPE appeared to have plugins that would defrag, so I tried that.  BartPE began to load, but then gave me a BSOD, requiring a hard reset.  That problem recurred on the second try.  BartPE did not seem to work, at least for purposes of this particular laptop.  It gave me a BSOD with STOP error code 7B.  As I watched it start to load, I was reminded that it used Windows XP, so I tried the Windows XP SP3 option from the Multiboot USB drive.  That gave me an Error 27 ("unrecognized command") in response to this command, apparently contained in the Multiboot CD:
find --set-root --ignore-floppies --ignore-cd /multiboot/ISOS/Windows XP SP3 Slipstreamed.iso
I was not able to determine whether the laptop would have accepted a CD in place of the USB drive, for purposes of booting WinXP, because I had no internal or external CD drive to try it with.  I could have tried a single-purpose USB drive containing only Windows XP, but at this moment I had insufficient time and interest to play with that.  My operating conclusion for the moment was that WinXP (therefore BartPE) did not work with this Multiboot USB drive on this machine.

Moving on, I looked to see if UBCD4Windows might have a defragger.  I noticed, in passing, that UBCD4Win contained a copy of DBAN (as did, I think, UBCD), so (if it worked) apparently I did not need to put a separate DBAN install on the USB drive.  UBCD4Win also had FreeDOS.  These options were available from its initial menu, and it appeared that I could add more.  I went into its menu option that would load UBCD4Win per se; I noticed, once again, that it relied on WinXP; and once again I got a BSOD.   As with BartPE, the STOP code was 7B.  A quick look at one troubleshooting guide seemed to indicate that WinXP and these other programs that used it (i.e., BartPE and UBCD4Win) might be failing to load updated drivers for the hard drive controller.  Another thread suggested going into the laptop's BIOS during bootup (F2 on my machine; DEL on some others) and changing the SATA setting from AHCI to Compatibility Mode.  I didn't seem to have exactly that option.  I did have one that was set as IDE->AHCI; I tried changing that to Native IDE.  It occurred to me, as I was doing that, that possibly I wouldn't be having this problem if I weren't trying to boot with the external USB hard drive connected; I had noticed that doing so tended to stall bootup on one of my desktop computers too.  Anyway, the AHCI change didn't help, and neither did booting with the external USB hard drive disconnected.  End of troubleshooting attempt.

I hadn't thought to verify whether the Windows 7 System Repair CD had a defragger.  I tried that now.  "DIR /S DEFRAG*.*" led to C:\Windows\System32\defrag.exe.  I tried it as "DEFRAG /C /H /M /U /X," but that didn't work.  It worked without the /M.  Apparently there was no "background" in the system repair mode.  (For details, type "DEFRAG /?")  So, OK, I did have an NTFS defragger on the Multiboot USB drive after all.  Only later would it occur to me that, by using the /C option, I might be asking the program to defrag the USB drive as well.  That concern faded, however, as the defragmentation went on . . . and on . . . and on.  Granted, defragmenting a fragmented 2TB drive can take a while.  And it did.  It took days.  I was not sure whether a Windows-based defragger would have taken just as long.  I had observed some pretty leisurely defragging operations from time to time.  But this was really a slow boat to China.

When the defragging was done, I decided to try running hard drive diagnostics.  The external USB hard drive was a Samsung.  When I tried to run the Samsung diagnostics that I had added to the Multiboot USB drive, however, I got the same "find --set-root" error as quoted above, except in this case it was referring to the Samsung HDD Diagnostics ISO, not the Windows XP ISO.  Basically, though, by this point it seemed that a lot of problems would be solved if they, or I, or someone could work through all the steps needed to make a Windows XP CD work on this USB drive.

And that's where I left it for now.  I had much of what I needed for the laptop on this one USB drive.  Until they improved Yumi and/or until I was able to troubleshoot the problems, I could perhaps get other ISOs to run from single-purpose USB flash drives apart from this multiboot one.  Despite the imperfections, these little devices had come a long way.

Sunday, June 17, 2012

Excel: Storing the Results of Repeated Calculations

I had a spreadsheet containing a random-number formula. Each time it would calculate, it would generate a different random number, and this would result in a different output value. I wanted to run that same calculation numerous times, so as to see what values tended to result; and I wanted to save those values for later analysis. This post describes how I addressed that problem.

With guidance from Stephen Bullen, I set up my spreadsheet to look like this:


Before describing how it worked, I will explain each of those boldfaced headings:
  • Random Guide. This was a random number that I chose. Basically, I had 3,141 items to select from, representing the rates of poverty in each of 3,141 counties in the United States. I wanted to select only 30 of those 3,141 items each time; but I wanted to do many such selections (of 30 items each time), to see what kind of results I would get, on average -- to see, in other words, how well those 30 items would represent the total of 3,141. (I was interested in this because of a separate statistics problem.) So this "Random Guide" value is the percentage of data points that I would not select each time. In my main table, I set up a Selected column, using a RAND (random number) calculation on each of the 3,141 rows in the main table, to decide whether that particular row would be selected in that particular go-round.
  • N. This was the number of items that actually got selected in this particular instance. Over the long haul, if I had my numbers right, the random number generator would average out at 30 items per iteration; but there could be quite a bit of variation in the individual case.
  • Mean. Similar to N. This was the mean (average) of the data values that got selected this time around. This was what I was really after, for statistical purposes: I wanted a list of the sample means that would result from many selections of approximately 30 random items from the data table.
  • Zero to Stop. If I put a zero in this cell, calculations would stop. See below.
  • Current Iteration and Next Iteration. If the spreadsheet was now calculating the 12th random selection from the table, this would read 12. At the point when I took the snapshot shown above, the calculation of my desired set of 1,000 sample means was nearly completed.
  • Mean Results. This is the mean of the values shown in the results table. This would show error values, first time through, because there would be some zero values in the Results table. When I took the snapshot shown here, I was on my second pass through the Results table, so the means appeared properly at this point.
  • Results:  Iteration. I set up the Results table to show the results of 1,000 calculations of Mean and N, based on 1,000 random selections of about 30 items from my table of 3,141 items.
  • Results:   Mean. On the first iteration -- that is, the first time I ran the calculation to select a sample of about 30 items -- I got, from those 30 items, a mean poverty rate of about 13.6. So that particular sample was a bit on the high side, when compared to the overall 13.3% rate that I would get from either (a) direct calculation of the mean of all poverty rates shown in the main table or (b) the means of 1,000 samples, as shown on the Mean Results line (above).
  • Results:   N. On the first iteration, the random number generator resulted in the selection of 36 items from the main table. There didn't appear to be a way  to restrict this to produce exactly 30 items each time, without screwing up the desired randomness of the selection process.
So now that I have explained what my spreadsheet was doing, I will explain how it worked. Here is an image of the formulas driving those cells, as displayed here using Tools > Formula Auditing > Formula Auditing Mode (shortcut: Ctrl-Backtick, i.e., Ctrl-`):


The explanations of those formulas are as follows:
  • Random Guide.  See above.
  • N.  This one counted the number of cells that were marked for selection (in the Selected column in the main table -- see Random Guide, above) in a given iteration's random selection.
  • Mean.  The average of the values displayed in the Selected column in the main table.
  • Zero to Stop.  If I put a zero in this cell, the spreadsheet would not enter values into the Results table.  After putting zero here, any other value would restart the count at Iteration 1 upon pressing F9. I would have had to refine the spreadsheet to let me restart at some other location.
  • Current Iteration and Next Iteration.  These cells circularly referred to each other.  That was permissible only after selecting Tools > Options > Calculation tab > Iteration.  I had to set the maximum number of iterations to just 1:  any larger value would cause the spreadsheet to generate lots of duplicative values that would distort my results.  Holding down the F9 key would sometimes insert zero values; I had to hit F9 each time to recalculate.  The differences between these two cells were that (a) Current Iteration checked Zero to Stop before proceeding, and (b) Next Iteration incremented the Current Iteration by one.
  • Mean Results.  Explained above.
  • Results:  Mean and  Results:  N.  These formulas looked at the Current Iteration value.  If it was not playing their tune, they would (circularly) keep whatever value they already had:  zero, at the beginning, or whatever had already been calculated for them otherwise.  But if their number was up, they would copy new values from cells I2 and I3.
The approach described here worked.  It was very tedious to have to hit F9 each time I wanted to calculate a cell, given that I was doing it over 3,000 times.  It was not clear why I was not getting the kind of automatic calculation I saw in Bullen's gs_demo.xls spreadsheet.  I was still working on figuring that out.

Saturday, June 16, 2012

Excel Bubble Sort - Arranging Many Cells in Many Columns


In a previous post, and to some extent in a later one, I worked on ways to sort Excel cells in which data started out in an irregular arrangement, like this:


My goal in that case was to get the data items arranged in the original (vertical) order in a single column, like this:


This time around, I had a somewhat different objective. It seemed likely to require me to continue past the outcome just shown, to return the data to their original columns, but without the empty spaces between them, like this:


The question for this post was, how would I do that?


As I reviewed the previous posts, it seemed that the key step was to use Excel's CELL function. In the example just shown, an adjacent table containing formulas like =CELL("address",A1) and =CELL("address",A2) would produce values like $A$1 and $A$2. I could make those formulas conditional. Then =IF(A3="","",CELL("address",A3)) would return a blank cell. One additional step: I could combine the cell's address and its contents, like this:


The formula for that was =IF(A1="","",CELL("address",A1)&"--"&A1).  Now I could set up a shadow table, matching the original one cell for cell, with the same number of rows and columns, and with each cell containing this kind of CELL formula.  

With that done, I could copy the parallel table to a word processor that would have the ability to remove line breaks.  (The find-and-replace symbol for a line break in Microsoft Word was usually ^p.)  The table I was working on had 100 columns and about 3,000 rows.  Each column had just 30 actual data items, so there were a total of exactly 3,000 (not 300,000) actual data items in that table; all the other cells were blank.  Word 2003 was not able to accommodate this table initially, so I pasted it into Notepad++ and saved it as a text file, and then opened that in Word.  After a series of find-and-replace operations (replacing double tabs (i.e., ^t^t) and so forth), I wound up with a single column of entries, 53 pages long.

I pasted that list back into a different Excel table, temporarily, for further operations.  I parsed the entries into separate columns, using FIND to divide each item into its address and its contents.  In the first cell shown in the example above, the address was $A$1 and the contents were 3.  Now I had the 30 items that had originally been in column A, the 30 items that had been in column B, and so forth, without any of those blank cells.  This resulting set of 3,000 items was  all still just in one long column, but I could sort them in column order; I could take another few steps and sort them in row order; or I could sort them by increasing data item value.

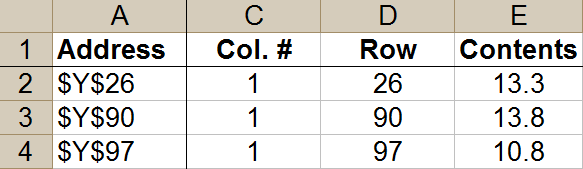
So at that point, I had achieved approximately what I had tried to do in at least one of the preceding posts.  Now there was the additional step of getting the 30 items pertaining to column A back into column A, leaving me with a table 100 columns wide but only 30 (not 3,000) rows deep.  To do this, I did go ahead and isolate out the column and row information into separate columns.  It was awkward to put the Excel column letters into proper order -- getting AA after Y, and so forth -- so I set up another column with numbers as substitute column indicators.  To do that, I did a unique data filter to get just a single representative from each column (e.g., AA, AB, ...), and then did a VLOOKUP to the appropriate number in a table built from that unique filter (e.g., Y = 1, Z = 2, AA = 3 ...).  This gave me a table which, after sorting, began like this:


I further modified this table by adding a Row # column after the existing Row column.  For this project, I didn't care what row the item came from in the original spreadsheet; I just cared that it was sorted in proper row order and that it would appear somewhere within rows 1-30 of my new table.  So the numbers in this new Row # column just ran from 1 to 30, matching the 30 items from a given column in the original spreadsheet (e.g., Y), and then they started over again at 1 and ran up to 30 for the next original column (e.g., Z), and so forth).  This was easy enough to arrange:  after setting up the first set of 1 to 30, the cells in all following rows could just refer to the value appearing 30 rows up.  So now I had set of 1, 2, 3 ... 30, appearing over and over again, all the way down my new Row # column.  I added a new NAddress column to express the combination of row and column: 


With that in place, I could do a lookup to complete the job.  This called for two tables.  The top left corners of those two tables looked like this:


Note the formulas shown for the top left data cell in each of these two tables.  The first table produced the thing that I would be looking for in my VLOOKUP; the second was the final data table.

I soon discovered that I should have included a VALUE formula in that final table's calculations; the resulting data were behaving like strings, not numbers, so I did have to do that additional transformation.  Otherwise, though, the data checked out OK, so this task was done.

Sunday, June 10, 2012

Batch Converting Many WordStar (.ws) Files to PDF

I had previously worked out a command that would convert all of the Microsoft Word (.doc) or WordPerfect (.wpd) files in a folder to PDF.  Now I wanted to try that on a batch of old WordStar (.ws) files.  This post discusses that task.

As described in the previous post, I set my PDF printer (Bullzip) to print without opening the resulting files and without interruptions, except that I think I did let it notify me of error messages.  I didn't want to have to approve each conversion manually.  Also, I had named the WordStar documents to have a .ws extension, even though that extension was not necessary back in WordStar's heyday.

I had also configured my copy of Word 2003 to recognize and open .ws documents.  I was not entirely sure how I had managed this.  My records suggested two possibilities.  One was to run a .reg file containing the following lines, so as to modify the registry in some hopefully appropriate way:

Windows Registry Editor Version 5.00

[HKEY_LOCAL_MACHINE\SOFTWARE\Microsoft\Shared Tools\Text Converters\Export\WordStar]
"Extensions"="ws"
"Name"="WordStar 3.3 - 7"
"Path"="C:\\Program Files\\Common Files\\Microsoft Shared\\TextConv\\Wrdstr32.cnv"

[HKEY_LOCAL_MACHINE\SOFTWARE\Microsoft\Shared Tools\Text Converters\Import\WordStar]
"Extensions"="ws"
"Name"="WordStar 3.3 - 7"
"Path"="C:\\Program Files\\Common Files\\Microsoft Shared\\TextConv\\Wrdstr32.cnv"
The other possibility was that I had apparently found a program that required me to add certain files to the Windows 7 Program Files folder, including particularly one called Wrdstr32.cnv.  A search suggested that anyone hoping to download such files from a virus-free source had best be using something like WOT.  It had been a while since I had set up my system, and in any case I had not tested these options individually to determine whether they were useful or necessary.  For all I knew, Word was capable of reading .ws files without any of this.  The point is that, at least on my system, Word was now capable of doing so.

With all that in place, I was set to run a command that would hopefully process a lot of WordStar files without much intervention from me.  I started Notepad, created a blank file called Converter.bat, and put this line in it:
FOR /F "usebackq delims=" %%g IN (`dir /b "*.ws"`) DO "C:\Program Files (x86)\Microsoft Office\Office11\winword.exe" "%%g" /q /n /mFilePrintDefault /mFileExit && TASKKILL /f /im winword.exe
I saved Converter.bat and put it in the folder containing the .ws files.  I probably could have used Excel to mass-produce commands that would have done the conversion in-place, for .ws files scattered among multiple folders, but my approach to that sort of situation tended to involve bringing the files to be converted together into one folder anyway, and then putting their converted replacements back where the original files had come from.

I ran Converter.bat in the .ws folder.  It ran successfully; I had PDFs in my Bullzip output folder for each WS document in the input folder.  Mission accomplished.

Saturday, June 2, 2012

Batch Verifying or Validating Scattered WAV Files

I had previously looked for ways to test MP3 files.  Now I wanted to test some WAVs.  This post describes one approach that seemed to work.

Initially, I tried using IrfanView, before rediscovering that IrfanView did not do audio file conversions.  After some searching around, I tried the command-line option in Boxoft WAV to MP3 Converter (freeware).  This looked promising.

To run the Boxoft converter, I used this syntax:

WavToMp3Cmd "D:\Folder\File Name.wav" -O"D:\Test\Output Filename.mp3"
This syntax seemed a little awkward, because (as shown) there was no space after the -O. (That's an oh, not a zero.)  Of course, I had to use quotation marks, as shown, because I had spaces in the folder and/or file names.  I had to run this command in the folder where the Boxoft program was installed (i.e., where WavToMp3Cmd.exe was located). That is, I had to run my batch file from there. That installation folder, on my x64 system, was C:\Program Files (x86)\Boxoft Wav to MP3 (freeware).

The foregoing command was pretty bare-bones.  I would have had to add more parameters, as described in the Boxoft help file, if I had wanted to produce high-quality output MP3s.  I was just creating the output MP3s to see whether the input WAVs were valid.  I would be deleting the output MP3s when the test was done.

I wasn't sure how the Boxoft converter would deal with a flawed WAV file.  To find out, I created a TXT file, changed its extension to WAV, and ran the foregoing command on it.  Boxoft produced an unplayable Test.mp3 in the output folder, so in that sense the test failed:  I would have preferred that it would not produce junk files.  Fortunately, Boxoft did register an error message on the command line. I captured that error to a log file by adding some stuff to the foregoing command.  That command now looked like this:
WavToMp3Cmd "D:\Folder\File Name.wav" -O"D:\Test\Output Filename.mp3" >> D:\Test\Log.txt
That was all on one command line.  Now I would have a Log.txt file that would capture error messages produced by the converter.  The next step was to work up my list of commands.  My WAV files were scattered in various folders around the computer, so as described in more detail in another post (and in several prior posts listed at the start of that one), I used a DIR command to identify the files I wanted to test (in this case, they were of the form 2010*.wav), and then I used Microsoft Excel formulas to create the relevant commands.  So now, for each file to be tested, I had an Excel row containing something like the command shown above.  I copied all those commands into a text file in Notepad, renamed that file's extension to be BAT (so that it would run), saved it in the Boxoft folder as noted above, and ran it.

In 10 or 15 minutes, the batch file was done; I had tested about 2,800 WAVs.  I verified that the number of output MP3 files equaled the number of input WAV files.  I wasn't sure how Log.txt would register errors, so I copied and pasted the entire log into a Microsoft Word document and reduced its size by doing global search-and-replace operations to remove the lines pertaining to the Title, Artist, and other settings that didn't matter to me.  (Word's special character to remove line breaks was ^p.)  I changed the remaining output to fit on one line (that is, I changed "^pSave to" to be just "Save to"), so that the file name and the result (e.g., "Success") would all be on one line.  I pasted this remaining text into Excel, did a FIND for lines containing "Success," and sorted the list according to whether "Success" appeared.  There was only one non-Success line.  It said, "Set the error bit rate. Please run WavToMp3Cmd to get help."  In the Word doc, I searched for that text.  I played the original WAV file whose name appeared just before that text.  It played OK.  I looked for the output MP3 file of similar name.  It wasn't there.  In this case, Boxoft hadn't created the failing file.  But then why did my file count agree?  Oh, of course, because the Log.txt file was in the output folder.  I wasn't sure why Boxoft had balked at the input WAV; but now that I had manually tested it and found it was OK, I didn't really care.

It occurred to me that Boxoft had produced an error when confronted with the obvious impossibility of converting a TXT file to MP3; but what about if some of the input files were mislabeled as WAVs when, in fact, they were MP3s or WMAs or some other kind of audio file?  I wasn't sure whether Boxoft would produce an error message or warning for such files.  I ran a version of the foregoing command on an input WMA, not renamed to WAV.  That crashed Boxoft.  I tried again after renaming the WMA to WAV.  That crashed Boxoft too.  I also tried with an input MP3.  Same results:  crashes.  I re-checked that the command did work with a genuine input WAV.  So apparently Boxoft would have crashed if my list of WAVs to be tested had contained an MP3 or WMA that was accidentally misnamed as a WAV.

To sum up, it seemed that the Boxoft command line converter, using a command with syntax shown above, was able to test large numbers of WAV files by converting them to MP3s, with error messages captured in a log file.

Friday, June 1, 2012

Samsung SMX-F34BN Camcorder Software & Accessories: Cluelessness

I bought a Samsung SMX-F34BN camcorder on eBay.  It came without a software or driver CD, cables, or power supply.  This was not quite the condition I had bargained for; but now that I had it, I proceeded to see what I could make of it.  I already had the cables, but it was a hassle to find the powers supply and software.  I decided to record these notes for the aid of anyone else encountering a similar situation.

Power Supply

I figured that the manufacturer would charge a fortune for a replacement power supply.  Their support webpage was hard to find:  their camcorders product page did not link to the SMX-F34BN (indeed, it led only to two standard camcorder models), and a search for SMX-F34BN yielded exactly one hit.  That was a link to the User Manual download webpage.  The User Manual was helpful, but that was the only help I got:  there was no link, on that webpage, to any hardware or accessories information. 

I ran a search on Radio Shack's webpage.  I wasn't able to verify, from the pictures and descriptions, whether they would have what I needed.  The User's Guide said the power requirements were 8.4V, 2.0W, but Radio Shack's pictures didn't make clear whether the plug would fit.  I called their 800 number, but their recording told me that they provided technical guidance only through their individual stores.  I called the nearest Radio Shack, located about nine miles away, but the guy said he couldn't advise without seeing the unit.

I went on eBay and bought a power supply for $14.  I didn't think of running a Google Shopping search for the needed product until I had already made that purchase, but it looked like I would have paid about the same price if I had gone that route.  When the power supply arrived, I plugged it in, and it worked.  End of problem.

Software and Drivers

To find the necessary software, I want back to Samsung's download webpage.  The Support Overview tab on that page yielded a list of questions about SC-X105L and other models unrelated to the SMX-F34BN.  That tab also contained a guide on "How to Edit Video with Intelli-Studio."  The Community Q&A tab on that webpage contained a number of questions, including several about how or where to get a power supply; virtually all of these questions were unanswered.  The FAQs & How-Tos tab did contain links for, among other things, Hardware, Power, and Software/Applications, but none of these led anywhere helpful and, again, many had to do with other models.  This was frustrating because, as one of those FAQs warned,

Before transferring digital images through the USB connection, you must install your camcorder's driver and software onto your computer. The driver and software are on the disc that came with your camcorder.
One FAQ did contain a reference to CyberLink MediaShow 4 software.  I guessed that MediaShow might be included in the software provided with the camcorder.  MediaShow was apparently a media management program, list price around $50.  A search, in response to the foregoing reference to Intell-Studio, suggested that Intelli-Studio was Samsung's own "play-edit" product, and that it did come with the SMX-F34BN.  I already had satisfactory software for these purposes, but didn't have the drivers.  Also, even if I didn't get a free copy of MediaShow out of the deal, at least I would want Intelli-Studio and any other utilities that Samsung could have provided.

On Samsung's download webpage, I clicked the Chat link.  This led to the following exchange:
Please wait for a Samsung Agent to respond. 
You are now chatting with 'Rosemary'. There will be a brief survey at the end of our chat to share feedback on my performance today.
Your Issue ID for this chat is LTK56401073602X
Rosemary: Hi, thanks for reaching out to Samsung tech support. How can I help you today?
Visitor: Hi, Rosemary. I have acquired a Samsung SMX-F34BN camcorder. I didn't get a CD or other software with it. I'm surprised that there's no option to download software from the Support downloads page that has the user's manual. Can you point me toward a download location?
Rosemary: Hello.
Rosemary: I understand that you wish to download the driver or software for the camcorder.
Rosemary: Would you mind holding a few minutes while I gather the required information for your request?
Visitor: OK.
Rosemary: Thank you.
Rosemary: Thanks for holding.
Rosemary: Was that an open box purchase?
Visitor: eBay.
Visitor: Normally, a manufacturer's support page will provide software downloads and, where applicable, updates.
Rosemary: I understand your concern.
Rosemary: But for few camcorders, the software and drivers are not provided on the support page.
Visitor: I don't understand. For camcorders as for other electronic devices, manufacturers normally supply downloads on their support pages. I am surprised that Samsung does not. Regardless, could you please tell me where I can download the software?
Rosemary: I apologize; the only place for the download of the software and driver is the support page. If the downloads are not provided on the support page, it is not possible to download the software online.
Visitor: Then where can I get the software?
Rosemary: Shall I provide the link to purchase the software CD?
Visitor: OK.
Rosemary: Before that could you please confirm if the camcorder is an open box purchase or a sealed purchase?
Visitor: Open box.
Rosemary: Thanks for confirming.
Rosemary: Please click on the link below to order the software CD for your camcorder:
Rosemary: You can even order it through phone by contacting J&J parts dealer at 1-800-627-4368. Hours of operation :Mon - Fri from 9:00 A.M to  8:30 P.M EST. They are the genuine Samsung parts dealers.
Rosemary: Are you able to access the above link?
Visitor: Yes. That webpage seems to offer only a CD containing "Mediashow" software. Is that the complete set of software that comes with a new camcorder?
Rosemary: Yes, I see that is the only CD included with a new camcorder,
Visitor: That website indicates that the shipping cost will be $5.75 minimum. $5.75 to mail a CD seems very expensive.
Visitor: I am disappointed that Samsung does not allow users to download the necessary software. This is unusual.
Visitor: That's $5.75 in addition to the purchase price of the CD.
Rosemary: I understand your frustration.
Rosemary: I will forward your concern to the webmaster.
Rosemary: I apologize for all the inconvenience.
Visitor: Thank you for your help, Rosemary. Have a good day.
I wasn't sure why Rosemary asked twice whether it was an open box purchase, when I told her I bought it on eBay.  Maybe she was thinking that there are traditional retail merchants selling unopened products on eBay.  Maybe she would have given me a CD without charge if I had said I had bought from one of those.  I can't say.  At any rate, the website she pointed me toward seemed willing to send me a copy of MediaShow (version 4, not the current version 6) for only $7.60 ($1.85 purchase + $5.75 shipping), plus whatever (if anything) else that might be on that CD.  This was better than other prices I found.  But, as I say, I didn't really need it.

I tried a search to see whether someone else might have the drivers and essential utilities available for download, but found nothing immediately obvious.  I sent an email to the people at the SamsungParts.com webpage to which Rosemary had directed me, asking if they could verify what was on the CD before I spent $7.60 and a week buying and waiting for it.  Their automated reply said I might have to wait a day for a reply, so I called them (800-627-4368).  She wasn't able to confirm exactly what was on the CD, but she said (a) this was not the CD with the user manual, and that was good (I had gathered, from a quick start page included with the camera, that there were actually two CDs, and the user manual CD was not the one containing the drivers), and (b) her company, SamsungParts.com, provided exactly the same accessories as would have been included with a new camera.  So despite their cryptic indication that this was the "MediaShow4" CD, it appeared likely that the CD contained more than just MediaShow.  So I went ahead and tried to buy it.  But now they wanted to charge me $8.25 for USPS Priority Mail.  I had to change from a PO Box to a street address to get it back down to $5.75, still via Priority Mail  Odd.  And then, when the order was nearly complete, here they are -- welcome to New Jersey! -- adding on another $4.15 handling charge.  So now we're up to $11.75 for a CD that cost $1.85.

I killed that and called Samsung (800-726-7864).  I explained to the lady that I didn't need or want a software CD; I just wanted a little driver program.  She confirmed that they could not help me with this -- that I would have to buy the CD and wait for it to be delivered.  I asked to speak to her supervisor.  She put me on hold for what would be, she said, just a minute or two.  That was at 1:33 PM.  The supervisor came on, ten minutes later, and after I explained the situation again, she put me back on hold while she checked it out.  When she came back, she said that it was an old item, which I found, again, to be an odd statement:  my impression was that the camera had come out within the past two to three years.  I appreciated that it was no longer within its brief one-year warranty, but I doubted that most people would buy a camcorder expecting it to last only one year.  That is, people are going to need support for products for several years at least.

She was ultimately unable to help me obtain the driver program.  In fact, she tried to steer me to CyberLink, where she said I could download a trial copy of MediaShow.  I explained again that I didn't need that, or Intelli-Studio either; I just needed the driver.  She apologized that she was unable to help me with this.  I asked to speak with her boss.  She said she would transfer me to the executive customer relations office.  She warned me, however, that this person would give me the same information that she had given me.  That was at 1:54 PM.  A few minutes later, someone else came on and listened as I explained the situation.  This individual said that the camera was plug-and-play and, as such, did not need any drivers.  This contradicted the language quoted above, wherein Samsung's FAQ had warned that it was necessary to install drivers first.  It also meant that, if this guy was right, Samsung's customer service representatives had repeatedly given me incorrect advice, to the effect that I had to buy the CD if I wanted to address the driver problem.

I had wondered if perhaps Windows 7 would detect and install the drivers automatically.  I could have just waited until the power supply arrived, a week or so later, and then I could have plugged in the USB cable and watched to see what happened.  One problem with this approach was that, if it didn't work, I would then have another wait of a week or so, until a CD or some other software source came through at last with the drivers.  Another problem was that users are often warned not to connect USB cables until drivers have already been installed.  There was, in other words, the possibility that waiting and then simply plugging would have made things worse.

I asked this individual if he would kindly pass along a suggestion to their webmaster, so as to include this information on the product webpage, along with FAQs that would relate to this model.  He said he would be submitting a report on this conversation.  At best, we seemed to be in a situation where Samsung would not think of this without someone like me to suggest it.  But anyway, the conversation was finally done at 2:01 PM.  So it took about a half-hour to get to him and get what was, I hoped, the correct information.

The upshot was that the software CD contained only (as this last person put it) editing software.  So if I wanted, I (or anyone else) could obtain MediaShow and Samsung's own Intelli-Studio for only $12, along with whatever else might be on that CD.  But I could not obtain a list of what was on that CD.  I wondered whether I could at least obtain a free copy of Intelli-Studio.  It didn't seem to be available in either CNET or Softpedia.  Posts in a CNET forum pointed me toward webpages from Software Informer and RapidShare, but someone seemed to have problems with the RapidShare approach and I distrusted Software Informer.  Another page -- a Samsung.com webpage, believe it or not -- said that, actually, Intelli-Studio was preloaded on the camera and could be installed onto the PC from there via USB cable.  That webpage pertained to the Samsung MV800, a still camera.  I would apparently not know, until the power supply arrived, whether the SMX-F34BN had the same capability.  There did not seem to be a download location on Samsung's own website for Samsung's own software.  (But let us not think too harshly of the Samsung webmaster.  I did find a Samsung webpage that, in exchange for the opportunity to keep resizing my browser window, was willing to tell me how to prevent Intelli-Studio from installing automatically on an unspecified Samsung camera model.)

When the power supply arrived, I did as advised:  I simply plugged in the USB cable.  It worked.  So the last guy's view was correct:  I didn't need drivers after all.  Unlike the MV800, there didn't seem to be an option to install Intelli-Studio from the camera to the computer; no menu option along those lines came up when I connected the USB cable.  So at this point, almost despite Samsung's best efforts, I was able to get the camera working.

Sunday, May 27, 2012

Batch Converting Multiple Word DOC Files to PDF in Scattered Folders

I had a large number of .doc files produced by Microsoft Word.  These files were in assorted folders.  I wanted to convert some or all of these files to PDF format.  This post describes the steps I took.

I had already tackled similar problems in several other posts, including these:

This post does not detail all of the steps described in those other posts.  If a step described here is not clear, perhaps one of those posts expresses it more lucidly.

I started by getting a list of the DOC files to be converted.  For this, I opened a command window and typed "DIR /s /b /a-d > doclist.txt."  It was OK if this DOC list included files that I did not want to convert:  I could go through the list manually at this point, deleting those that I did not want to convert, or I could do that in the next step.  The next step was to copy and paste the list of files from doclist.txt into Microsoft Excel or some other spreadsheet.  This gave me a list of file and path names that looked like this:
D:\Folder3\Subfolder 8\Filename Z.doc
Since some paths and/or filenames contained spaces, I would tend to use quotation marks in commands relating to them, in both Excel and the command window.  In Excel, I used the REVERSE function and other spreadsheet commands to extract the path (e.g., "D:\Folder3\Subfolder 8\") from the filename (e.g., "Filename Z.doc").  So now I had separate columns showing the paths and the filenames for each entry in doclist.txt.  This would be a good point for using formulas to identify groups of DOC files that I did not presently wish to convert to PDF.

The next step in the spreadsheet was to identify the filename without the extension, and to add PDF instead of DOC to that rump filename.  In other words, in this step I went from having Filename Z.doc to having Filename Z.pdf.  This gave me the essential ingredients for the batch commands that I would assemble on each line of the spreadsheet and would then paste into Notepad and save as a .bat file, so as to automate the conversion.

There were two ways to proceed at this point.  One was to leave the DOCs in place, in their home folders, and do the conversion and replacement right there.  I didn't like that approach.  It was too hard to be sure of what had happened in all those scattered folders.  The approach I preferred was to bring all those .DOC files together in one central folder, do the conversion, and then use the spreadsheet to construct batch files that would put those PDFs back where they belonged and, optionally, delete the DOCs from which they had come.

Bringing the DOC files to a central folder could be done very easily with a search program like Everything, searching for *.doc.  It could also be done with batch commands constructed in the spreadsheet.  An Excel formula producing a command of the latter nature would be something like ="move /-y "&char(34)&[cell containing filename including .doc extension]&char(34)&" D:\CentralFolder").  It would be important not to take this step -- that is, not to move the files away from their home folders to the central folder -- until I already had a list of where the files came from originally.  Without that, I'd have a big collection of DOC files and no idea of where they belonged.  Note that files bearing identical names, coming from different folders into one, could require some advance manual renaming to avoid overwriting.  In that case, after renaming but before moving, it would probably be advisable to re-run DIR, so as to get the current filenames.

Once the files were all in a central location (in this case, D:\Conversion), it was time to work up the batch conversion process.  For this, first, I set the General and Options tabs in Bullzip (my free PDF printer) so that it would operate without asking questions or opening PDFs, and would save the PDFs to a designated folder (D:\Conversion\PDFs).  Then I saved this command into a batch file that I called Converter.bat:
FOR /F "usebackq delims=" %%g IN (`dir /b "*.doc"`) DO "C:\Program Files (x86)\Microsoft Office\Office11\winword.exe" "%%g" /q /n /mFilePrintDefault /mFileExit && TASKKILL /f /im winword.exe
I saved Converter.bat in the folder containing the DOC files (in this case, D:\Conversion) and ran it.  It worked away for a while, at the speed of one document every few seconds, until it had produced one PDF for each of my DOC files.  Several times during the process, Word or Bullzip stalled with error messages (e.g., "Word cannot start the converter Rftdca32.cnv").  This seemed to result primarily from corrupted Word docs.  There seemed to be little alternative but to delete those files except where I could find a backup.

Now I had a set of DOCs and a set of PDFs.  One easy way to make sure that I had a copy of PDF for each DOC was to view the folders using a Windows Explorer alternative like FreeCommander.  In FreeCommander, I could combine the DOCs and PDFs together, sort by file type, select all DOCs, re-sort by file name, and look for instances in which alternating lines were not regularly highlighted.  (In Windows 7, Windows Explorer had lost the ability to retain highlighting after files were re-sorted.)  At this point or later, one could then just delete all DOCs that did have a corresponding PDF.  DoubleKiller Pro would provide a similar approach.  Another method, more suitable for large numbers of files, was to use the DIR and spreadsheet approach outlined above, writing formulas to check for identical filenames (not counting extensions).  Of course, there was no need to actually delete the DOCs if I wanted to keep both the PDF and the DOC.

I postponed that step to verify, first, that I would not be needing any of the DOCs anymore.  I had previously worked on ways to check PDFs by converting them to JPGs and seeing which ones converted successfully.  In that previous effort, IrfanView (my preferred tool) had not behaved as expected, so I had grappled with other approaches.  This time, however, the quick IrfanView batch conversion went smoothly.  This gave me a JPG displaying the first page of each PDF.  My decision there was that, in the interests of speed (and to avoid having to go through every page of every PDF),  I was content to look just at the first page.  There could still be errors on later pages of a PDF, but that would be rare.  If the first page came through OK, I could be fairly confident that most docs converted successfully.  So now, using IrfanView, I flipped through those JPGs quickly.

With these steps out of the way -- PDFs checked, superannuated DOCs deleted -- I went back to my Excel spreadsheet and worked up batch commands to move the new PDFs back to where the DOCs had been.  I had changed a couple of names along the way, so I had to move those manually, but the rest went automatically.  Project done!

Thursday, May 24, 2012

Videos from the Mid-2000s

The contents of this post have been merged into a new Best Videos Ever post.

Wednesday, May 23, 2012

Windows 7: Considering a RAID Array for Performance

It had been more than a year since I had last looked at adding a RAID array to improve performance.  I could see that my hard drive light was on very often, and the system slowed way down when that happened.  So it seemed advisable to take another shot at RAID.

I had a reasonably good backup arrangement.  As such, I wasn't too worried about the risk of losing data.  My motherboard would accommodate RAID 5 or 10, if I wanted to add more drives, but at this point hard drive supplies were still reeling from the floods in Thailand.  Prices were high on HDDs, and large solid-state devices (SSDs) were still prohibitively expensive.  For at least the near future, I was looking at a two-drive RAID 0.

The main problem with RAID 0 would be the amount of time required to restore my data from backup, and the increased likelihood that I would have to do so (because, in RAID 0, failure of either drive would mean failure of the entire array).  It made sense to make the RAID array as small as possible.  It would need to contain data that I used frequently, but there were a number of other things, less frequently accessed, that I could put onto a third drive that would not be part of the array.  A smaller RAID array would be quicker to restore and would also require smaller, less expensive drives -- which, in turn, would make it more feasible, sometime down the line, to add more drives and switch to a different RAID flavor.

The Moo0 System Monitor was informing me that, at present, my hard drive delays were coming from my existing data drive, not from drive C.  I had not been eager to reinstall Windows onto a new RAIDed drive C.  I was also not too keen on the prospect that Acronis backups and restores involving a RAIDed drive C could be complicated.  So there seemed to be some reason to put my programs partition (drive C) onto that standalone third drive as well.

While I was content with my backup arrangement on a day-to-day basis, I did not presently have an hourly backup.  If I decided to make that third drive a large one, I could use some of its space to store hourly backups.

The plan, then, was for the third drive to contain my drive C partition, my large and infrequently used data items, and perhaps an hourly backup partition.  It could also hold the partition where I stored my Acronis drive images, the partition containing my customized Start Menu and installation-related programs, and the partition that I used for various programs' cache folders and such.  The only partitions on this third drive that would need to be backed up would be drive C, the data partition, and the Start Menu partition.
At this point, there was a pause.  I found myself involved with a large spreadsheet task that was just dragging in its calculations. Those calculations were taking so long that I was forced to take considerable breaks from the project to do other things while Excel would grind away. The problem there was that, when I did come back to the spreadsheet, sometimes it would be several hours later. By that point, my head was no longer tuned in to the project; I was thinking about other things. As a result, I was forgetting and overlooking things that I would have handled much more efficiently if the computer had been able to keep up.

So before installing the RAID array, I upgraded my CPU.  To my surprise, although Moo0 had not seemed to indicate this, the faster CPU contributed noticeably to other tasks as well.  This performance boost took away some of the urgency behind the transition to RAID.

A second hardware upgrade made an even greater difference.  I had found that sometimes I would have to wait quite a while for the screen to keep up when I would switch from one program to another.  I had assumed that the hard drive was the reason.  As I could see from its activity light, it was keeping very busy, and Moo0 was indicating that it was the bottleneck.  Still, it occurred to me that some of the display issues might be due to limits in the motherboard's onboard graphics.  So I installed a 2GB video card.  Suddenly things were *much* better.  It seemed that the hard drive may somehow have been working overtime to compensate for inadequate video.

The speedup wrought by these two upgrades -- the faster CPU and the more capacious video card -- was so substantial as to eliminate, for now, the need for a RAID array.  In that sense, these other hardware upgrades paid for themselves.  I was pleased not to have to spend the time and endure the upheaval that would be involved in getting my data onto a RAID array, as well as the more-than-doubled risk that a single hard drive failure would wipe out all (not just some) of my data.

There were two other considerations favoring my decision to delay the RAID investment until a time of greater need.  First, as I could see, solid state drives (SSDs) were coming down in price.  Second, I was doing some housecleaning, deleting or compressing some materials and putting others onto separate partitions.  It seemed possible that, at some point, an SSD (or, conceivably, an SSD RAID array) containing a smaller set of files would be much more affordable.  Hence, for now, the RAID investment was once again on the back burner.

A Million-Day Calendar with Explicit Julian-Gregorian Comparison

I wanted to look up a historical date.  Specifically, I wanted to know which day of the week it occurred on.  As I was looking for an answer to that question, I gradually came to the impression that there did not exist a standard calendar.  I decided to build one.  This post describes that process.

Someone may already have created what I was looking for.  But I wasn't finding it.  What I was looking for was, simply, the Official Calendar.  Of the United States, of the Catholic Church, it didn't matter -- just an official calendar that some reputable body had actually committed to print (preferably with explanations, and without errors).

What I was finding, instead, was lots of rules about how to calculate an official calendar, as well as various tools that would assist in those calculations.  This was fine, as far as it went.  But we don't generally tell people who prefer the Celsius temperature scale to just use the Fahrenheit and convert it.  Instead, people living in places that use Celsius have thermometers that show them the literal answer, without the need for a manual conversion process.  I wanted something like that for calendar dates.

Ultimately, I created a calendar covering a million days, starting on January 1, 500 BC. I produced that calendar as a spreadsheet, printed it as a PDF, and made both available for download. I don't often revisit this post. As of an update in early 2023, these materials are available for download through my SourceForge project page or at Box.com or MediaFire. See also my download blog post.

The PDF is a 38MB, 10,000-page document.  I would not recommend printing more than necessary.

Assumptions and Calculations
Built into the Million-Day Calendar

I chose Excel 2010 to develop the calendar because that version of Excel could accommodate somewhat more than a million rows.  I did not use Excel's built-in date arithmetic, though, because of its known errors.  That is, I did not ask Excel to calculate the necessary dates automatically.  Instead, I calculated them in a semi-manual process.  The process was not entirely manual, because I did not calculate row by row, day by day, for each of the million days shown.  Instead, I developed formulas that would count forwards or backwards from a certain date, and I applied those formulas to the million rows, usually broken into several segments due to historical changes in calendar calculation.  There were some manual adjustments as well.

I found that a million days would cover approximately the period from January 1, 500 BC to the year 2238 AD.  This seemed like a good range for most purposes. For dates outside this range, there would still be the option of using a formula or calculator, or of adding another tab to extend the spreadsheet.

As shown in the preceding paragraph, I was inclined to use AD and BC to refer to calendar eras.  AD was short for Anno Domini (Latin for "in the year of the [or "our"] Lord"). AD and BC (short for "Before Christ") were thus based on an early medieval calculation of the number of years before or after the birth of Jesus. This religious origin was an addition to other religious origins (e.g., "Thursday" deriving from "Thor's Day"). Instead of AD and BC, an apparent minority of non-Christians preferred to use CE (short for "Christian Era" or "Common Era" or "Current Era") and BCE.

Traditional chronology did not incorporate a year zero (i.e., 0 AD or 0 BC).  That is, the calendar went directly from 1 BC to 1 AD.  The original concept may have been that there was no need for a year zero, since Jesus was not born until the start of the first year of his life (incorrectly calculated as 1 AD).  This variation would make no practical difference in the AD era:  for example, the number 2012 represented the year in which this post was written.  It would lead to difficulties in the BC era, however.  For instance, the rule on leap years (involving division by 4) would produce a leap year in the year 4 AD and, before that, in the year 0; but since there was no year 0, the prior leap year was in 1 BC.  Hence, traditional BC dates did not fit exactly with the rule that leap years are evenly divisible by 4.

The calendar in effect at the time of Jesus was the Julian calendar, introduced by Julius Caesar in 46 BC -- a year which, by decree, was 445 days long.  The Julian calendar was revised several times, finally stabilizing in 4 AD.  For present purposes, the key innovation of the Julian calendar was the decision to define the year as equal to 365.25 days, adjusted via leap years in every year evenly divisible by 4 (e.g., 2008, 2012, 2016).  The Julian calendar eliminated the leap month Mercedonius but did not otherwise significantly change the names or lengths of months.  For purposes of year numbering, epochs (i.e., reference years) in the early centuries of the Julian calendar commonly used regnal systems based on the current ruler or other officials (e.g., "January 1 in the second year of the reign of the Emperor Justinian"), but there was a semi-chaos of other epochs as well.  For instance, the Anno Mundi era started from calculations of the date on which the world was created, and the Ab urbe condita era started from the hypothesized date when Rome was founded.

The big change after the institution of the Julian calendar came in 1582 AD, when Pope Gregory XIII introduced the Gregorian calendar.  The Gregorian reform assumed the use of AD rather than regnal or other epoch systems; the AD epoch concept had been gradually spreading during the Middle Ages.  Gregory's principal contribution was to revise leap year calculations.  Over the centuries, the Julian calendar had become increasingly inaccurate with respect to the actual equinox.  That is, the calendar might say that it was March 21 -- the time for Easter -- and therefore daytime and nightime should each be about 12 hours long; but in fact, according to the clock, that day would already have arrived more than a week earlier.

In other words, the Julian calendar was falling behind the real world because the calendar was inserting too many leap years.  The extra leap days were making the Julian calendar late:  it would say the date was only March 11, when it really should have been March 21.  Gregory thus removed ten days from the calendar for October 1582, to catch up, and also changed the leap year calculation slightly.  The Gregorian rule for leap years was that every year evenly divisible by 4 would still be a leap year, except that years evenly divisible by 100 would not be leap years unless they were also evenly divisible by 400.  So 1700, 1800, and 1900 would not be leap years, but 1600 and 2000 would be.

This adjustment was still not perfect, but because of gradual slowing in the Earth's rotation, it was apparently pretty close.  The slowing issue, which I did not explore, may have been related to the difference between the tropical year and the sidereal year.  The Julian and Gregorian calendars were apparently based on the tropical year, which was the amount of time that it took the Sun (as seen from Earth) to come back to the same place as it was on the previous vernal (spring) equinox.  The sidereal year was an alternative to the tropical year:  it was the amount of time that it took Earth to return to the same relative position as it had occupied a year earlier, as measured with reference to certain stars.

These findings about the Julian and Gregorian calendars called for some decisions, for purposes of constructing a million-day calendar.  One such problem had to do with the present day.  My computer might tell me that it was May 6, 2012.  This would be a date in the Gregorian calendar.  Its appearance on my computer, my wristwatch, and everywhere else would testify to Gregory's widespread success.  I knew, however, that there was also a Chinese New Year and a Jewish calendar and all sorts of other calendars that still had meaning for various cultural and religious purposes, as well as the similarly named but essentially unrelated Julian Year system used in astronomy.  Even the Julian calendar continued to be used in Eastern Orthodox churches.  I decided that the intended spreadsheet approach to the million-day calendar might enable others to add these alternative calendars as they wished.  Because of the size of the spreadsheet and the relative rarity and potential complexity of these other calendars, however, I decided that I would not try to build any of these alternatives into the calendar myself, but would instead focus on the Julian and Gregorian calendars that predominated in the West during the timeframe addressed in the million-day calendar.

Another problem had to do with adoption dates.  The Gregorian adjustment of October 1582 specified that the Julian calendar would end on October 4, 1582; the days of October 5 through October 14 (inclusive) would not exist; and the Gregorian calendar would begin on October 15, 1582.  This rule was adopted at very divergent rates:  immediately, in several Roman Catholic countries, but elsewhere with considerable delays and confusion continuing into the 20th century.  The problem here, then, was that October 5, 1582 did not exist in Spain, and yet someone in England could be staring at a letter dated October 5, 1582, and that would make perfect sense according to the Julian calendar, which would continue to be used in England until 1752 (at which point England would need to delete eleven days, not ten, to get in sync with the Gregorian reform).  During the transition period in England, people commonly used the terms "Old Style" (abbreviated as "O.S." in English, and as "st.v." in Latin) to refer to the Julian date, and "New Style" ("N.S." or "st.n.") to refer to the Gregorian date.

As just described, the Gregorian calendar officially began (and was officially implemented in some places) on October 15, 1582; the Julian calendar officially ended on the preceding day, which (according to the Julian) was October 4, 1582.  But one could also say that October 4, 1582 (Julian) was the same as October 14, 1582 (Gregorian).  This way of looking at the matter would require proleptic (i.e., anachronistic) calculations.  Specifically, there would be a proleptic Gregorian calendar for all dates before October 15, 1582 on the Gregorian calendar, and there would also be a proleptic Julian calendar for all dates before January 1, 4 AD on the Julian calendar.  October 13, 1582 (Gregorian) would be the same as October 3, 1582 (Julian); October 12 (G) would be the same as October 2 (J); and so forth, back in time.

Since the Gregorian calendar did not exist before 1582, the statement that the Battle of Hastings occurred on October 14, 1066 would imply that it was October 14 according to the Julian calendar, not the Gregorian.  While it could be confusing to cite proleptic Gregorian dates for events that were made part of history according to the Julian calendar, there seemed to be some applications for which a proleptic Gregorian calendar could be useful.  For example, someone might be interested in determining whether a certain event happened on the actual equinox, as distinct from the date represented as the equinox in the Julian calendar.  In developing the million-day calendar, I thought it would thus be useful to display Julian and Gregorian dates side-by-side, so as to confirm the accuracy of the calendar and/or of others' conversions between the two, as described more fully below.

To a much greater degree than the proleptic Gregorian calendar, it seemed that the proleptic Julian calendar could be useful for a variety of historical situations.  The concept here was, in essence, that one could work backwards to construct a Julian calendar for dates long before Julius Caesar, and could use that calendar to construct a list of standard dates when various historical events occurred.  Although sources rarely seemed to specify what calendar they were using, it appeared that the proleptic Julian calendar was in fact being used widely for this purpose.  There would certainly be scholarly disputes as to the conversion of ancient chronologies to Julian calendar terms (so as to interpret, for instance, a statement that a certain event occurred in the 245th year since the founding of Rome), but at least the calendar system itself would be consistent over centuries.

Developing and Testing the Million-Day Calendar

I added proleptic Julian calendar calculations to the million-day calendar. I started these calculations by adding a separate Julian Days table to the spreadsheet. The concept of the Julian Day was proposed by Joseph Scaliger in 1583. Julian Days were simply a count of days, beginning (for astronomical and historical reasons) with Day Zero at 12:00 noon on January 1, 4713 BC. (Julian Days could include decimal values for fractions of a day, such as 0.083 = 2 PM.) So, for instance, Julian Day 7 arrived at noon on January 8, 4713 BC.

There were no years in the Julian Day system, but Julian Days could be used to calculate the proleptic Julian calendar, in which every fourth year would be treated as a leap year.  Because there was no Year Zero in the Julian calendar, Scaliger's first year of 4713 BC was a leap year.  (That is, in a system that had a Year Zero between 1 BC and 1 AD, 4713 BC would have been called 4712 BC.)  The resulting calculations produced Julian dates, in the spreadsheet, that were consistent with those reached by John Herschel in his Outlines of Astronomy (1849, p. 595).  Specifically, January 1, 4004 BC was Julian Day 258,963; the destruction of Solomon's Temple (which Herschel put on May 1, 1015 BC) was on Julian Day 1,350,815; and Rome's founding (which Herschel put at April 22, 753 BC) was on Julian Day 1,446,502.  Moving into the million-day period beginning on January 1, 500 BC (Julian Day 1,538,799), the spreadsheet matched Herschel's calculation that the Julian calendar reformation of January 1, 45 BC occurred on Julian Day 1,704,987; the Islamic Hijra calendar began on Julian Day 1,948,439 (July 15, 622 AD); and the official last day of the Julian calendar (October 4, 1582) was Julian Day 2,299,160.  It tentatively seemed that the spreadsheet's Julian calendar portion was accurate.

I also added Day of Week calculations to the spreadsheet, beginning with the common assertion that January 1, 4713 BC was a Monday (in, implicitly, the proleptic Julian calendar).  For the dates cited in the preceding paragraph, these calculations indicated that January 1, 4004 BC was a Saturday; May 1, 1015 BC was a Friday; April 22, 753 BC was a Tuesday; January 1, 500 BC was a Thursday; January 1, 45 BC was a Friday; July 15, 622 AD was a Thursday; and October 4, 1582 was a Thursday.  Further, I extended the Julian calendar beyond its official end to Thursday, November 7, 2238 AD (Julian Day 2,538,798).  According to the spreadsheet (and also the Julian Day arithmetic, i.e., Julian Day 2,538,798 minus Julian Day 1,538,799), that was the millionth day (inclusive) from Thursday, January 1, 500 BC.  These particular Julian Day numbers and day-of-the-week calculations matched the values produced by an online date calculator appearing on a NASA webpage.  It tentatively seemed that the spreadsheet's Julian Day calculations were corresponding accurately with Julian calendar dates.

Next, I produced a proleptic Gregorian calendar in the million-day calendar, adjacent to the Julian calculations.  The starting point for this calendar's calculations was its commonly recognized starting date of Friday, October 15, 1582.  As noted above, the preceding day of October 14 on the Gregorian calendar (G) (if such a date had officially existed on that calendar) would have been Thursday, October 4 on the Julian calendar (J).  So the spreadsheet's presentation of Julian and proleptic Gregorian dates had to match up on the row containing the values of October 14 (G) and October 4 (J).  That is, both had to have the same Julian Day value of 2,299,160.  From October 14, 1582, I extended the Gregorian calendar back to January 1, 500 BC.  I decided not to extend this proleptic Gregorian calendar back into the period before 500 BC, though there were situations in which such an extension might have been useful.

There were some interesting things in the relationship between the proleptic Gregorian calendar and the Julian calendar.  At the starting point in the 16th century AD, the Gregorian dates were later than the Julian.  As just noted, October 14, 1582 (G) was equivalent to October 4, 1582 (J).  The Gregorian allowed fewer leap years, so the difference between it and the Julian began to narrow with each additional century (except for those evenly divisible by 400), going back in time.  The ten-day difference of 1582 thus became a nine-day difference on the first previous day when the formulas for the two calendars differed:  there was no February 29, 1500 (G), but there was a February 29, 1500 (J).  By the time one arrived back at the third century AD, the difference between the two calendars vanished.  That is, as noted by Peter Meyer, the two calendars had exactly the same dates from March 1, 200 AD to February 28, 300 AD.  This was no coincidence.  Gregory had designed his reform so that Easter would occur at about the same time as it had occurred in 325 AD, when the Council of Nicea (also spelled Nicaea) discussed such matters.  So during the century ending on February 28, 300 AD (J), both calendars showed the same dates (e.g., February 1, 300 (J) = February 1, 300 (G), and both are Julian Day 1,830,664).  Before the third century, the Gregorian calendar predated the Julian by progressively larger amounts, until January 1, 500 BC (J) would be represented as December 27, 501 BC (G).  Going back still farther, dates on the Julian calendar would continue to fall three days later every 400 years, so that January 1, 4713 BC (J) would arrive a month earlier on the Gregorian, in late November 4714 BC.  On the other extreme, in the centuries following 1582 AD, the Gregorian dates became progressively later than those of the extended Julian, until November 7, 2238 AD (J) was equivalent to November 22, 2238 (G).

I checked the foregoing dates and days of the week using another online calculator as well, produced by Fourmilab Switzerland.  I began by entering Julian Day numbers and then seeing what results this calculator would produce for Julian and Gregorian calendar dates.  This calculator took the approach of inserting a Year Zero in the proleptic Gregorian calendar, so its statement of BC dates differed from the values shown in the spreadsheet by one year.  For example, the Fourmilab calculator indicated that January 1, 45 BC (J) was equal to December 30, 45 BC (G), whereas the spreadsheet would put the latter as December 30, 46 BC (G).  Fourmilab's approach seemed incorrect in this regard.  For mathematical purposes (as in e.g., the ISO 8601 approach, below), there would need to be a Year Zero; but the historical reality seemed to be that proleptic calculations in both Julian and Gregorian calendars did not have a year zero.  Fourmilab was not alone here; the conflation of mathematical consistency with historical fact had evidently produced some confusion in other computing situations as well.  At any rate, after adjusting for that divergence in BC years, the results of the Fourmilab calculator did match up with those yielded by the spreadsheet and the NASA calculator.  This calculator and the spreadsheet also agreed that February 1, 200 AD (G) was Julian Day 1,794,140 and was also February 2, 200 AD (J).  (The NASA calculator did not do proleptic Gregorian calculations.)

I looked at one other online calculator, produced by CSGNetwork.  I did not attempt a redundant comparison against all of the dates listed above.  Instead, I focused on the especially problematic period of the first two centuries AD.  In that timeframe, the CSGNetwork calculator seemed to be in error.  Specifically, a "Calendar Date Entry" of January 1, 1 AD yielded Julian Day 1,721,425.5.  The NASA and Fourmilab calculators and the spreadsheet agreed that January 1, 1 AD (J) should rather be Julian Day 1,721,423.5 or 1,721,424.  So if "Calendar Date Entry" in the CSGNetwork calendar was intended to refer to a Julian calendar date, its Julian Day output was incorrect.  It did not appear that the calendar intended to refer, rather, to a Gregorian calendar date of January 1, 1 AD, because it then stated that its Julian Day value of 1,721,425.5 was equivalent to January 3, 1 AD (G).  In that latter regard, it was correct.

To some unknown extent, online calculators presumably used formulas that had been devised to facilitate date calculations.  For example, Bill Jefferys presented a formula for converting Julian Days (and, perhaps, dates on the Julian calendar) to the proleptic Gregorian calendar, but indicated that it would be inaccurate before 1582, and especially for years before 400 AD.  Paul Dohrman offered a procedure for converting Julian to Gregorian, and J.R. Kambak offered one for conversions from Gregorian calendar dates to Julian Days.  Dohrman's approach, as I understood it, required these steps:
  1. Truncate to centuries (e.g., 622 AD becomes 6).  In the case of BC dates, treat them as negatives and start by subtracting a year first (e.g., 499 BC becomes -500, which becomes -5).  This calculation produces X.
  2. Calculate 0.75X minus 1.25.  So 622 AD » 6 » 3.25 (using » as shorthand for "becomes"), and 499 BC » -5 » -5.
  3. Truncate decimal points.  So 622 AD » 6 » 3.25 » 3.  This is the number of days to add to the Julian date to find the Gregorian.
This procedure produced some results consistent with the spreadsheet and the Fourmilab calculator, converting July 15, 622 AD (J) to July 18, 622 AD (G), and January 1, 500 BC (J) to December 27, 501 BC (G) (after Year Zero adjustment).  This procedure did not seem to work in the first two centuries AD, however.  For example, in the case of July 1, 1 AD (J), Dohrman's approach seemed to yield the incorrect value of June 30 (i.e., century 0 * 0.75 – 1.25) rather than June 29 (G).

There also seemed to be a problem with Kambak's long formula for converting Gregorian dates to Julian Days.  It is possible that I did not copy or interpret that formula correctly.  The version that I tested was as follows, where Y = Gregorian year, M = Gregorian month, D = Gregorian day, and JD = Julian Day:
JD = 367Y – 7(Y+(M+9)/12)/4 – 3((Y+(M–9)/7)/100+1)/4 + 275M/9 + D + 1721029
As I translated this into an Excel formula (placed into cell D2), it read as follows (assuming the values of Y, M, and D were entered into cells A2 through C2, respectively):
=367*A2-7*(A2+(B2+9)/12)/4-3*((A2+(B2-9)/7)/100+1)/4+275*(B2/9)+C2+1721029
That formula's results varied from those produced by the Fourmilab calculator for certain dates checked above, such as July 1, 1 AD (G) and October 14, 1582 (G).  The variance in these instances was very small, however.  Specifically, the values for those two dates produced by the formula and the Fourmilab calculator were 1,721,606 vs. 1,721,606.5, respectively (for July 1, 1 AD (G)) and 2,299,159 vs. 2,299,159.5, respectively (for October 14, 1582 AD (G)).  That is, the Fourmilab calculator exceeded the formula's output by only 0.5 day in each case.  Unfortunately, this variation was not consistent.  For July 15, 622 AD (G), the Fourmilab calculator produced a value of 1,948,435.5, which was 0.5 day smaller than the Julian Day value of 1,948,436 produced by the formula.  Moreover, for November 22, 2238 (G), the Fourmilab calculator's output of 2,538,797.5 was 1.5 days larger than the figure of 2,538,796 produced by the formula.  In each of these several instances, the spreadsheet agreed, again, with the results produced by the Fourmilab calculator, after rounding the latter's 0.5-day output upward.  It appeared, in short, that this formula was very close but not entirely accurate.

By this point, checking of the spreadsheet had begun to transition into critiques of the ways in which various calculators and other tools had interpreted and applied various sources (e.g., Tantzen, 1960). I took this as a preliminary indication of the potential usefulness of the million-day spreadsheet, at least where an explicit presentation of dates might facilitate visualization of calendar developments.  While further usage and testing would be helpful in identifying points at which errors might have crept into the spreadsheet, it did preliminarily appear that the spreadsheet could provide a useful tool for date calculations and conversions.

The ISO 8601 Refinement

I developed the Gregorian section of the spreadsheet in one additional way. The International Organization for Standardization (ISO) had produced a standard prescription (known as ISO 8601) for calculating dates.  This prescription appeared likely to be useful for a variety of purposes, so the spreadsheet contains a column devoted to it.

The ISO 8601 standard adopted Gregorian date numbers. One effect of the standard, for present purposes, was to prescribe standard ways of representing dates. There was a YYYY-DDD ordinal date option, which used the day of the year, where day 366 would have a value only in leap years (e.g., 2012-366 = December 31, 2012).  In the spreadsheet, I used the year-month-day format (e.g., 2012-05-06 = May 6, 2012). ISO year values were ordinarily displayed with four characters (e.g., padded with leading zeros in 0023 rather than 23) for consistency.

A second effect of ISO 8601 stemmed from its adoption of a Year Zero, with apparently the same effect as what was sometimes called astronomical year numbering.  In this approach, before the epoch of 1 AD, the absolute value of the ISO year was one less than the traditional year (e.g., ISO year 0000 = 1 BC; ISO year –0001 = 2 BC). So the million-day calendar started on ISO date -0500-12-27 (i.e., December 27, 501 BC (G)). The numerical approach of ISO 8601, using minus signs instead of "BC" and likewise dispensing with "AD," had the advantage of avoiding controversy regarding the use of those two traditional modifiers.  The Fourmilab calculator (above) appeared to be implementing an ISO 8601 approach in its calculation of BC dates.

With the Gregorian calendar presented in ISO format, it would have been possible to apply another kind of check to the spreadsheet's day-of-the-week column.  This check would have used what was known as the Doomsday technique.  That technique, useful for quickly calculating the day of the week for a given date, seemed unnecessarily complicated within the million-day calendar spreadsheet, where one could simply use the Julian Day.  That is, since Julian Day 0 occurred at noon on Monday, January 1, 4713 BC, every Julian Day evenly divisible by 7 would be a Monday.  This way of calculating the day of the week, for a given date on the Gregorian calendar, seemed to produce the same results as I had calculated by using a formula that copied, into each day-of-week cell, the name of the day that appeared in the 7th preceding row.

Official and Local Calendars

As previously noted, Gregory intended that the last day of the Julian calendar (October 4, 1582) would be followed by the first day of the Gregorian calendar (October 15, 1582).  That intention was followed in a number of countries and, at this writing, was implemented in various online calculators (e.g., those appearing on U.S. Naval Observatory and NASA webpages).  It appeared that 1582 was the most plausible candidate for the year in which the world converted from the Julian to Gregorian calendars.  In short, this combination of proleptic Julian (to 4 AD), Julian (from 4 AD to 1582 AD), and Gregorian (since 1582 AD) appeared to form the most credible version of the world's official calendar.  The spreadsheet thus expresses what appears to be the Official Calendar that I had sought at the outset.

Some remarks appearing in preceding paragraphs have already acknowledged certain aspects of that de facto official calendar.  For one thing, the concept of the Julian Day was built from a starting date calculated according to Julian reckoning, but came to serve as a means of cross-reference between the Julian and the later Gregorian calendars.  So the spreadsheet column that presents the Julian Day number corresponding to a particular day on the Julian or Gregorian calendar does not belong solely within either the Julian or Gregorian sections of the calendar.  Rather, it seemed to be best presented in the spreadsheet's Official Calendar section.

Likewise, a given date would be a Monday, or a Tuesday, or some other day of the week, regardless of the date number given to it on the Julian or Gregorian calendars.  So it would have been redundant to present separate day-of-week columns in each of those calendars' parts of the spreadsheet.  Instead, the day of the week appears just once, in the Official Calendar section.

That section also presents the official date, in two different formats.  First is the traditional format, using BC or AD indicators of era.  These traditional dates are provided in the somewhat condensed but still recognizable YYYY-MM-DD form.  As such, their components (e.g., the number of the month) are accessible for further date calculations, as users may desire, with the aid of Excel text functions (e.g., MID, FIND).  The column presenting the Official Date in Traditional Format is thus the specific statement of the Official Calendar in approximately the form that now appears to be used by most people.

Second, the spreadsheet also presents the official date in ISO format -- specifically, with minus signs and a Year Zero, modifying the traditional presentation.  To emphasize, this is the official date.  It uses the Julian calendar for dates before October 15, 1582, and therefore is not the ISO 8601 date.  It is simply an indication of how the traditional, official date looks when stated in ISO style for purposes of numeric calculations.

As noted above, substantial portions of the world did not adopt the Gregorian reforms in 1582.  The spreadsheet is adaptable for purposes of developing localized versions that may accommodate reforms implemented in later years.  In the process of preparing this post, I also found a useful calendar with local customizations at TimeAndDate.com, though a brief look suggested the presence of inaccuracies like those identified in other calculators (above).

Uses of the Million-Day Calendar

This post has explained the creation of a million-day calendar covering the period from 500 BC to 2238 AD.  That calendar is provided in spreadsheet format, one row per day.

This spreadsheet format seems to have facilitated identification of potential errors in certain tools designed to assist in use of, and interactions between, the Julian and Gregorian calendars as well as the Julian Day and ISO 8601 date systems.  It may prove useful in other contexts calling for calculations, demonstrations, or cross-comparisons among calendars and systems, including some that users may add.

The spreadsheet presentation may also be useful in less technical, more data-oriented applications.  Within the limits of computing power and spreadsheet capacity, there may be tasks that call for an ability to add columns of information, to be filled at a rate of one item per day (or week, or other time period).  For instance, at this writing, I would like to find a database (if one exists) that would show something like the leading headline of the day -- the sort of thing that one might expect to find on the front page of the New York Times, for instance, if that newspaper had existed on the day of the Battle of Hastings.  If no such database exists, perhaps this spreadsheet, shared among a number of potential contributors, could help to bring about its existence.